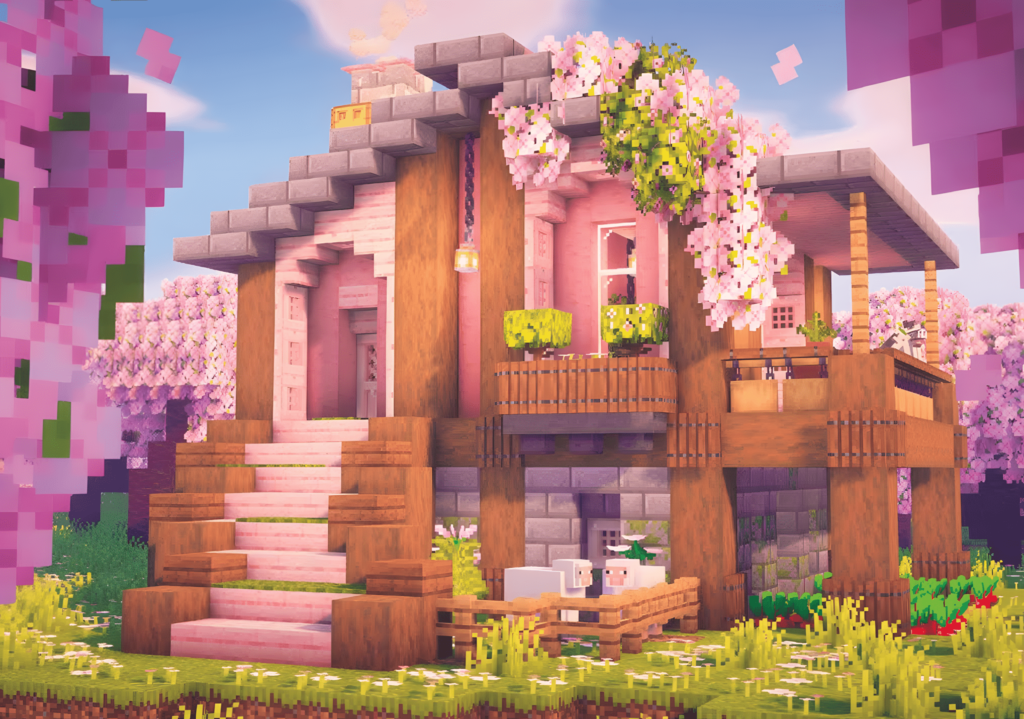
Hello friends! Today I’m going to share with you one of my favorite Survival houses that I built in the Cherry Blossom biome that came with Minecraft 1.20. While creating this aesthetic masterpiece, I was inspired by the video of talented content creator Zaypixel, and I want to give him a huge thank you with this guide! Thanks to his amazing design, I was able to combine aesthetics and functionality in my own Minecraft world.
Contents
- Step 1: Materials List and Strategic Planning (00:25)
- Layout Planning Tips (00:40)
- Step 2: Foundation, Walls and Window Placement (01:07 – 06:01)
- Step 3: Unique Roof and Exterior Details (08:09 – 13:27)
- Step 4: Interior Layout and Survival Base (17:19 – 21:34)
- 🎮 Pro Player Commentary: Lighting and Design
- Frequently Asked Questions (FAQ)
- Can I use another wood type instead of Cherry Wood?
- Is building a basement really necessary?
- What should I do to have vibrant graphics like in the video?
The Minecraft 1.20 update divided the player base in two: Aesthetes and Adventurers. However, the Cherry Grove biome united everyone at a single point: the breathtaking landscape created by those pink leaves. This biome is not just a gameplay area, but also offers a promise of peaceful digital living.
So, how did I build this starter house that’s worthy of this magnificent landscape, functional enough to meet all your survival mode needs, and at the same time an architectural marvel? Here’s my detailed building guide based on Zaypixel’s minimalist and elegant design, showcasing all the beauty of Cherry Wood.
This house is not just a shelter, it’s also the pinnacle of Minecraft 1.20 aesthetics. Let’s get started! 🛠️

Step 1: Materials List and Strategic Planning (00:25)
The key to a successful build is using the right materials in the right places. The goal with this house is to use natural, contrasting blocks that balance the dominant pink tone of Cherry Wood.
| Material Category | Recommended Blocks | Purpose | Aesthetic Role |
| Main Structure | Cherry Log, Cherry Wood, Birch Log | Walls, Floors, Interior Frame | Warm and Pink Main Body |
| Foundation/Contrast | Stone Brick, Andesite | Foundation, Chimney, Basement | Adding weight and durability to the structure |
| Roof | Dark Oak Stairs and Slabs | Roof Covering | Creating vibrant contrast with dark tones |
| Lighting | Lanterns, Fences | Interior and Exterior Lighting | Security and Decoration |
| Furniture | Barrels, Crafting Table, Bed | Survival Functionality | Storage and Production |
Key Materials: Cherry Wood, Stone Brick, Birch Wood, Dark Oak Stairs.
Layout Planning Tips (00:40)
Before starting construction, I followed the simple layout steps shown in the video. The main outlines of this house will form the foundation for both the ground floor and the basement. Framing the exterior walls with Cherry Logs gives the structure a vertical texture and sense of solidity.
Step 2: Foundation, Walls and Window Placement (01:07 – 06:01)
Unlike a standard Minecraft house, this one includes two main layers (ground and upper floor) and a basement.
- Solid Foundation (01:07): I started by surrounding the house’s base with one layer of Stone Brick. This ensures your build sits more solidly on the ground and creates a beautiful color separation with the pink Cherry Wood. I also planned the basement entrance at this stage.
- Vertical Strength (03:58): Using logs vertically instead of horizontally in the exterior wall frame creates architectural depth. The Birch Logs used especially at corners and between windows are an elegant detail that balances Cherry’s bright pink tone.
- Scenic Windows (06:01): The whole point of the Cherry Grove biome is the scenery! That’s why I used large glass panels. I framed the windows with Birch Fences or stairs to add depth. This simple detail transforms an ordinary window into an aesthetic feature.
Step 3: Unique Roof and Exterior Details (08:09 – 13:27)
The most critical step that determines your house’s silhouette is the roof.
- Layered Roof Design (08:09): Using Dark Oak in this design was a must. Dark Oak’s brown/black tone creates a strong and sophisticated contrast with Cherry Wood‘s light tone. I didn’t make the roof just a single slope; I placed stairs in a layered fashion to create visually interesting overhangs and layering on the roof. I added Dark Oak Slabs in the gaps between roof layers to create smooth transitions.
- Functional Aesthetics: Balcony and Chimney (10:00): Adding a Balcony to watch the scenery was a luxurious addition to this house. The Stone Brick Chimney (12:03) adds both a rustic texture to the house’s exterior and provides liveliness with smoke effects (using a campfire).
- Landscaping and Lighting (13:27): Exterior Decoration takes the house from “built” to a “lived-in place.” I lit up my garden with Cherry Leaves, fences, and lanterns. Hanging lanterns in high places both prevents mob spawning and creates a wonderful ambiance at night.
Step 4: Interior Layout and Survival Base (17:19 – 21:34)
The architectural genius of this house is that it separates aesthetics and functionality into two distinct areas: Rest and Production.
- Upper Floor: Peaceful Bedroom (17:19): The upper floor is my main rest area. I positioned my bed next to the large window. Barrels are a better choice than chests for hidden storage and a minimalist look. This is a sanctuary where I’ll find peace after a long mining expedition.
- Basement: Survival Center (21:34): I moved my basic Survival activities (furnaces, brewing stands, enchanting table, and heavy storage) to the basement. This strategy ensures the ground and upper floors always remain organized and aesthetic. The basement is optimized for all my crafting and production needs.
🎮 Pro Player Commentary: Lighting and Design
“In such a light-colored house, interior shadows can be annoying. Instead of just placing lanterns on the floor, hide light sources with brightness value 14-15 (for example, glowstone or sea lanterns) in ceiling spaces to make lighting completely invisible. Also, by using plenty of exterior Cherry Leaves, you can bring the biome’s ambiance into your home. Remember, a good survival base should never have dark corners!”
This Cherry Grove Starter House is a perfect project for every player transitioning to Minecraft 1.20. Both beautiful and efficient. Start gathering your materials right away! 🍒
Frequently Asked Questions (FAQ)
Can I use another wood type instead of Cherry Wood?
Yes, but the main appeal of the structure is Cherry’s pink tone. If you don’t have access to Cherry wood, Acacia Wood or Birch trees with their light tones create the closest alternatives. However, I recommend not changing the roof material (Dark Oak) to maintain the contrast.
Is building a basement really necessary?
While a basement isn’t required, I strongly recommend it. Typically, functional blocks like furnaces, chests, and brewing/enchanting stations create visual clutter. Moving these blocks to the basement ensures the house’s main living areas stay clean, aesthetic, and relaxing. Additionally, this extra floor provides you with a safe and spacious storage area protected from mobs.
What should I do to have vibrant graphics like in the video?
The incredible vibrancy and shadows seen in the video are usually achieved using Shaders and Resource Packs. Zaypixel used BSL Shader and popular texture packs like Jerm’s Better Leaves in this video. If your computer’s hardware is sufficient, you can bring your house to life by installing these packs.
I hope this guide inspires you and helps you make an aesthetic start to your Minecraft adventures! Which biome do you like building houses in? Let me know in the comments! 👇



Comments are closed.